Hey there ALO readers! I’m Sandy and I blog about a mixture
of fashion and beauty, with the odd lifestyle post, over at http://www.absolutebeaut.com. I’m
absolutely chuffed to be guest posting for Sabrina today. A Little Obsessed was
one of the first ever blogs that I started reading so to be contributing to it
today with a Manicure Monday post is super exciting.
.jpg)

of fashion and beauty, with the odd lifestyle post, over at http://www.absolutebeaut.com. I’m
absolutely chuffed to be guest posting for Sabrina today. A Little Obsessed was
one of the first ever blogs that I started reading so to be contributing to it
today with a Manicure Monday post is super exciting.

Now, I’ve recently become
pretty addicted to eBay – especially a cheeky browse on the train to work on my
phone. Warning: this can become pretty dangerous for your PayPal account so I
wouldn’t particularly advise it, but there are so many bargains to be had!
Including 99p striping tape – perfect for all kinds of nail art, my favourite
being this technique, where you leave the tape on to create a super cute
contrast to the rest of your nail. It’s a little bit fiddly but once you’ve got
the hang of it, you can have this manicure down in 30 mins flat. So, here’s the
step by step…
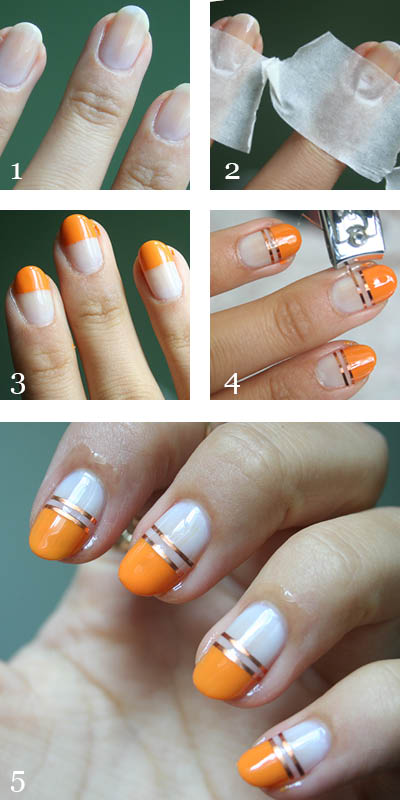
1.
After a base coat, paint nails with a sheer nude
shade. I used Ballet Slippers from Essie.
After a base coat, paint nails with a sheer nude
shade. I used Ballet Slippers from Essie.
2.
Take some masking tape, and place this across
your nail – about 2/3rds of the way down.
Take some masking tape, and place this across
your nail – about 2/3rds of the way down.
3.
Then take a nail polish of your choice. I
thought a bright orange would look fab with the rose gold striping tape and
went with Hampton Court Palace Gardens
from Nails Inc. A cheaper alternative
could be the shade Mango from the Barry M Gelly range. Paint the end of your
nail and while still wet, remove the tape.
4.
On to the fiddly part! (Quick side note: make
sure your nail polish is completely dry before you apply the tape, I love the 45 second top coat from Save the Nail to
speed it all up). Now, the easiest way I found to apply the tape was to cut off
strips that were longer than my nail, attach one end and then trim the other
end down to size before smoothing down the striping tape completely.
5.
Paint over the design with at least two layers
of top coat to make your mani lasts and ensure that the striping tape stays
put!
Paint over the design with at least two layers
of top coat to make your mani lasts and ensure that the striping tape stays
put!

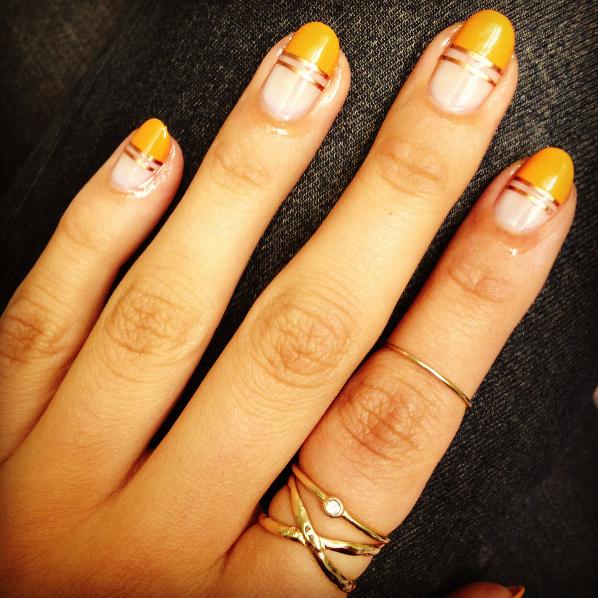
The finished look is
definitely one of those ‘I can’t stop staring at my nails’ manicures and I
absolutely adore this colour combo for the summer months. Having said that, I
think this design would look lovely using a more nude shade on the tip or even
red! Like I said, you can use striping tape to create all sorts of different
effects (have a quick Google), so I’d definitely recommend investing in some.
Totally worth the 99p 😉 I got mine here.
A huge thank you to Sabrina for letting me take over her
Manicure Monday feature – I’d love to hear what you guys think J
Manicure Monday feature – I’d love to hear what you guys think J
They look lovely!
♥ Filthy Fashion ♥
I really like this so pretty :O xx
http://www.krystelcouture.com ♥
So cute! Ellegant and beautiful!
Oh wow these look amazing!
Katie Loves..|UK Fashion & Beauty Blog
This is such a simple but effective idea!
catrinteleri.blogspot.co.uk
This is such a super pretty look! Definitely like the colours together.
Miss Stylicious
I need to get some of that nail tape!!
Making It Sparkle
oh my goodness how cute!!! i love it – would have never thought of using nail tape to create something so cool 🙂 love your photos too!
rachel x
blush&brunch
Wow this looks so good!
http://hollybumblebeee.blogspot.co.uk/
This nail polish is gorgeous!! Definitely need to try this out.
http://www.lisa-cequejaime.blogspot.co.uk
xxx
wow that looks really nice, I also like your rings. Where did you get them from??
http://welldressed25.blogspot.co.uk/
Very interesting manicure <3
And this orange polish..is so cute!
If you want..take a look at my beauty blog!
Kisses
Alexandra by beautydiarybyalexandra.blogspot.gr
omg…that is soooooo pretty!!
these looks amazing! such a great design x
http://fairygobmother.blogspot.co.uk/
Wow nice nail art. We can apply any colors for this art work.
Love this! Thanks for sharing how to do it.
Lovely
Amber
http://www.ambermcniff.co.uk
I knew it was yours! (@ceejayell_ coming over from the #GiveItAGo Twitter chat!)
This nail art has clearly been on mind since 2013! Haha! Still love it, looks beautiful!
http://www.ceejayell.blogspot.co.uk